Timeline Save The Dates
Before we even got engaged, Jason and I very badly wanted to find a template for a "relationship timeline" save the date card that we'd seen in a magazine. I couldn't find one anywhere, though, so I decided to make my own.
Ironically, as a photography major, I don't own Photoshop or Adobe Illustrator (waiting til my student discount can get me one for cheapies!) so I did this entirely in Word. Guess what that means?? You can do it too!!!
I had ours printed on Vista Print, on oversized postcards, and they cost me less than $10 for 100. Vista Print rocks.
If you wanted to print them yourself, however, that would be completely doable.
Instructions
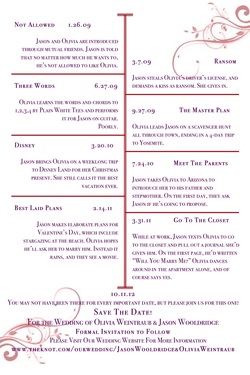
- Jot down 3-10 "memorable" moments you and your fiance want to include in your timeline. For us, we're quirky lil oddballs so we included all kinds of embarrassing stuff that our parents will probably give us "that look" for broadcasting to our entire families. Whatever! We love it. A lot of couples just do the basic date they met, date they started dating, date they got engaged, date of wedding.
- The general idea of the timeline will be from when you met to the date of your wedding, so the ending can be "00.00.00, you may have missed some of the dates but please be there for this one!" or variations on the theme. Bounce a couple clever wordings back and forth with your fiance and decide on the wording. Split them up and set them in order, and if you want to you can come up with a title for each Date.
- Open a document in Word. First, in your formatting palette, find "Add Objects" and click on the "Lines" tab to insert a line. Select the one that looks like a plain old line without any arrows, and click the center of your page (go by the rule at the top) and drag the line down the page. If it gets all crooked-ey, just straighten it out.
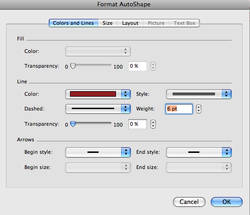
- To format your line (make it ridged like mine, make it thicker, change the color, what-have-you) double click on it, which will open up a formatting window. You can make your changes here. You'll need to do this for each individual line, however, so try to remember the specifications that you use.
- Leave space at the bottom of the page for your final date/information. Click the same line button you clicked before, and add a little horizontal end to the top of your line, and one at the bottom.
- Now, based on how many "dates" you'll be using, guestimate where your horizontal time-lines will be. Place the first point on the line, and pull the line out toward the left of the page a few inches to where you like how it looks. Measure down to where you'd like your first right line to be, staggered a bit from the left, and insert it the same way you did the left one.
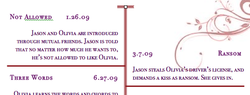
- The rest of this process is kind of trial and error. Over each time-line, you'll insert a text box. (Insert-text box-drag to where it's going). As you insert the text boxes, you'll have to move the lines around, change the font sizes, expand or diminish the text boxes, etc. You have to move everything around based on how many words each box has, how many lines you have, and all the other aspects. Once you get the hang of it, you'll figure out what your format needs to be and fit everything into that.
- Flourishes: If you want flourishes, save them to your computer as an image. I saved mine off of google images and then edited it in paint (you really don't need a lot of tech knowledge here) to crop it down to a smaller image.
- Then, I clicked Insert-->Picture-->From File. I selected the flourish, and positioned it where I wanted it (top right corner). I decided I also wanted one in the bottom left corner, so I repeated the insertion steps. To get it to mirror the right-hand flourish, I rotated the image three times to have it coming "out of" the bottom left hand corner.
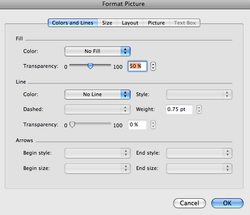
- To get the faded transparent effect, double-click on your image. A formatting window will come up like it did for the lines. Slide the transparency bar to around 50% (that was my preference, but if you want it more/less transparent just try out different percentages).
- Play around with it. Change your wording, your font, your font size, whatever you'd like. You'll find a style that you like and you'll run with it.
Step 4

Step 5
Step 6
Step 10
